


When I am at home or office, connecting to internet is not issue. However, if I am outside or travelling and if I want to connect to internet from my laptop, IPad or any mobile device, I had to find a WiFi hotspot. But now a days with all these advancements in mobile communication, connecting to internet using the smart phone is very simple.
In this post I will show you how to use an android smartphone as a modem.
All you need is a data pack enabled on your mobile connection. I have the 3G data pack enabled on my cell phone.
There are two ways of connecting to internet.
Below are the steps:
Using your cellphone as a WiFi router.
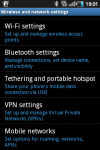
- In your android smart phone, go to Settings -> Wireless and Network Settings -> Mobile networks and select the “Use packet data” option. Also uncheck the “Use only 2G Networks” option
- Again go to Settings ->Wireless and Network Settings->Tethering and portable hotspots
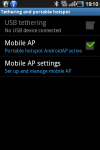
- Select the second option “Mobile AP”. You should see a blue wifi icon in your cellphone notification bar
- Go to your laptop, IPad or any device which supports WiFi, search for available wireless networks and select “Android AP” option.
- You are now connected to the internet. Just open a browser and start browsing.
Note: You can configure your Mobile AP setting to give a different name and also making the connection secure. For this you have to select the “Mobile AP settings” option under “Tethering and portable hotspots”
Connect using USB cable (USB Tethering)
- Connect your android smartphone to the laptop using the USB data cable.
- Make sure the phone’s drivers are installed properly. In most cases, windows will automatically recognize and install the drivers automatically. If it does not, then use the CD which is given along with the cellphone.
- In your android smart phone, go to Settings -> Wireless and Network Settings -> Mobile networks and select the “Use packet data” option. Also uncheck the “Use only 2G Networks” option.
- Again go to Settings ->Wireless and Network Settings->Tethering and portable hotspots
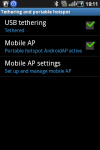
- Select the “USB tethering” option and you should see a blue circle icon in the notification bar. See the below picture.
- You are now connected to the internet. Just open a browser and start browsing.
Note : I have tested this on Windows PC and Laptops only

0 comments:
Post a Comment